
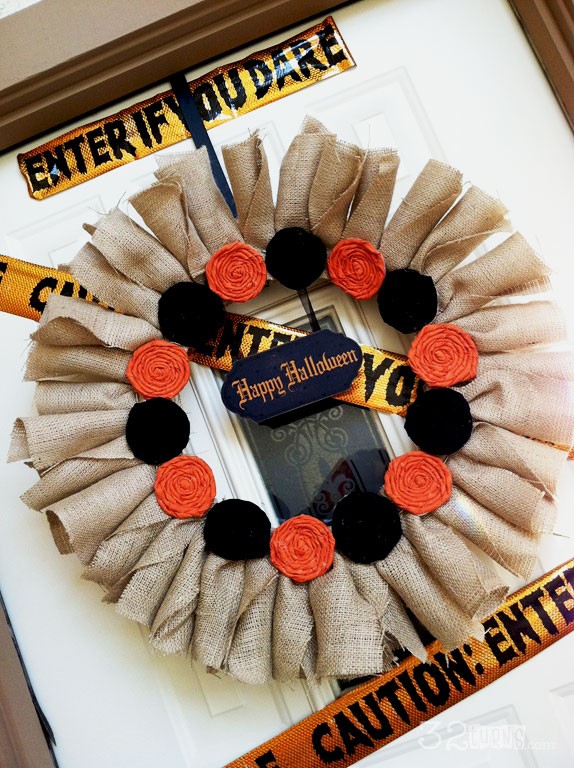
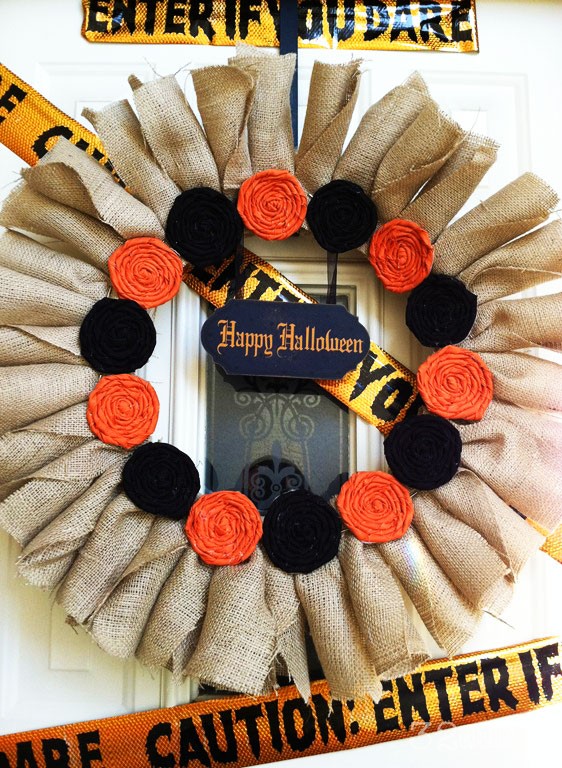
Burlap Halloween Wreath
October 1st!! Halloween is almost here! Well…not really “almost” here. But we all know how fast these fall and winter months go by. Pretty soon it will be Halloween, then turn around and Thanksgiving, and then before you can blink it is Christmas! Agh!!
These 3 end of the year holidays are my favorite to decorate for. I definitely like to keep the decorations up as long as I can even though my hubs often thinks I am crazy! sometimes I think he is right!. So, since the first day of October has arrived, UP go the Halloween decorations starting with this Burlap Halloween Wreath.
I won’t lie, I didn’t make this particular wreath this year, I made it last year. I don’t normally use the same wreath 2 years in a row for any holiday. I like wreaths, and since there are so many out there I want to make and creating them is pretty inexpensive, I tend to make a new one for every holiday each year. Plus….let’s face it, wreaths are a super duper pain to store. So…..I normally just DON’T store them!! {hee hee} But, this wreath is my FAVE of all the Halloween wreaths I have ever made and I wanted to use it for another year.
Alas, sadly I do not have a tutorial to show you how I made it. WHAT!?!? you say. Well, I wasn’t writing this blog last year so I did not shoot a tute. Ha ha, that totally rhymes. 🙂
I will however, tell you to the best of my explanatory writing abilities, how I made this burlap Halloween wreath because it was not hard at all!
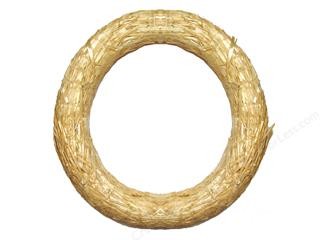
First I bought supplies: brown, orange and black burlap, T pins, and a large wreath form. Like this one here.
Here is a pic of some T Pins too, just in case you don’t know what they are. {wink}
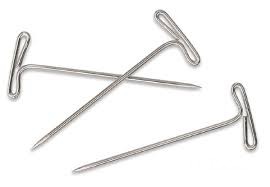
Cut the brown burlap into largish squares. The number of squares you will need depends on how big your wreath form is. Roll the squares into loose rolls and pin to the wreath with the T pins.
Cut the orange and black burlap into strips and using a hot glue gun twist, roll, and glue into flowers. Here is a tutorial for similar type flowers.
Once you have enough burlap rolls pinned onto the wreath form and enough flowers to circle the inside of the wreath, glue the flowers down. This hides the pins, and also some of the imperfect gaps you will have between the rolls.
I bough a little wooden Halloween sign and hung it using black ribbon. You could make your own sign, buy one like I did, or not use one at all.
You could also make the same flowers or totally different ones. That is what is so fun about making wreaths. So many different ways to do it and all of them are awesome sauce!
If you end up making a Halloween wreath, I would love to see it. Leave me a link in the comments so I can check it out. After all, next year I will definitely have to make a new one and would love some fresh ideas. Can’t use the same wreath THREE years in a row for sure!!

You might also like...
13 Responses to Burlap Halloween Wreath
Leave a Reply


I love burlap but I need to learn how to use it. I think we need to do some lessons!
Thanks for linking to Take-A-Look Tuesday over at Sugar Bee Crafts – you were featured this week!
Mandy, SugarBeeCrafts.com
Thanks Mandy! Love, love, love it!
This is such a great way to change up the traditional burlap wreath…great job! This would be great to link to Create It Thursday #23…it’s live now! Hope to see you there!
Awesome Leslie! I linked right up and added you to my weekly party list to link up to! Thank You!
Such a great wreath! 🙂
Thanks Megan! Appreciate the visit and compliment :O)
Love this! I love how you rolled the burlap! Thanks for sharing. I’d love for you to come join our Halloween Party!!!
Thanks Chelsea! I totally linked up, I appreciate the invite!
Darling! I need a wreath and was thinking about burlap. Thanks for the idea! Linda
I really like this wreath! I love the alternating orange and black rosettes! I’m pinning this fabulous wreath right now!
Thanks girl!!! And thanks for the pin! Love it! If you make one I would love to see how it turns out. I like how everyone puts their own twist on the same project.
This is a really cute one! I have been looking for one for my door. Also, your picture looks really cool, good job!